Home Why Woodworking? What are classes like? Projects 1 Projects 2 Projects 3 Projects 4 Who teaches this?
arrow uparrow down
owl burned
owl painted
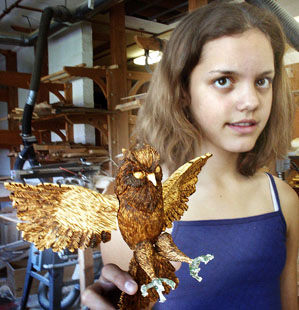
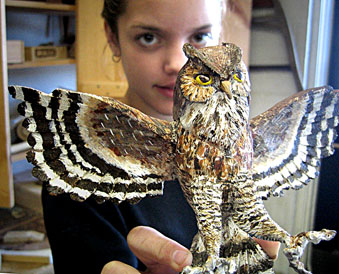
This owl was amazing when wood burned.
And stunning when painted!

Home Why Woodworking? What are classes like? Projects 1 Projects 2 Projects 3 Projects 4 Who teaches this?

logo

What Do Students Make?
(Projects, page 1)
 

    There are so many kinds of things we make in the shop that I can't possibly cover them all in these pages, but browsing the photographs should give you a taste of what we do it and how we do it.  And why.

    Each type of project is essentially a curriculum unit with its own set of skills. concepts, questions to be answered, problems to be solved, frustrations to overcome and accomplishments to celebrate.  Students learn different skills depending on what projects they choose, but the over-arching goals are the same.  They learn that they are capable of success and mastery.  They learn that they can accomplish surprising tasks using the teacher as a guide, coach or mentor.  They experience pride in a fine finished project. And, I hope, they will find pleasure in the whole process.

    Each student is expected to choose a project and plan it with me.  For newcomers, certain kinds of projects are good choices. Those are the ones that involve basic skills and that don't require a lot of designing or discussion so that they can get their hands on wood quickly.  Typical good starter projects are bowls, spoons, jewelry boxes and bongo boards, which are the first examples presented below.


    Beginners can start more complex and/or longer-term projects if they convince me that they are capable, that they understand what is involved and are willing to make the commitment.  Many students started Pond Yachts this year as a first project, knowing it might take them three or more quarters to get them done.  A few beautiful boats were actually finished by the beginning of third quarter!

    I am thrilled when a student proposes a project that is new and different.  I love the challenge it presents for the student and for me.  I make it clear that it will require more of my time than is usual and that he or she may have to wait until I get all the "easy" projects going.
  Students who want to build something special need to understand that they will get my support in spades, but it may take a while.

    Even the more routine projects call for the student's creativity and skill.  No two bowls ever look alike, nor spoons, nor boats.  Working with hand tools, each student's project is a statement of an individual's creativity and effort.


Bowls    


    Most of our bowls are made of three layers of pine boards that the students glue and clamp into a single block.  After they lay out inner and outer circles with dividers, they chop out the inner shape of the bowl with a gouge and club.

    They scrape and sand smooth the inside and then I cut the outside shape for them on the bandsaw, matching the outer shape to the inside by tilting the saw's table to varying degrees.  This is where the student first sees how the finished bowl will look!

    The bowl is mounted on the foot powered lathe for serious sanding, inside and out, eliminating defects and smoothing it to amazing softness. The bottom of the bowl is signed and dated on the wood burner and it is finished with mineral oil.  It's a lot of work, but students are always pleased and amazed at how beautiful it is when the color and grain glow under the oil!
Burned Bowl
This bowl has wood burned
decoration on the bottom too!
Jack'sBowl
This pine bowl is decorated with a name!
Annie'sBowl
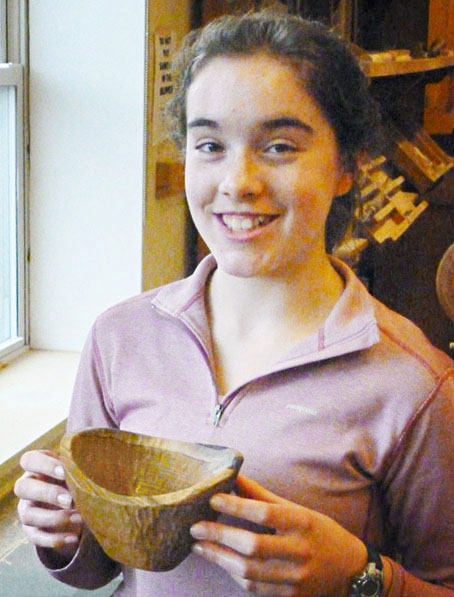
This bowl was hand carved, inside
and out, from a chunk of butternut log!

Spoons
   

    Our spoons are usually made of cherry, a beautiful hardwood that is easy to shape but stands up to heavy use in the kitchen.  I keep a variety of sample spoons that students can examine and use as patterns and that they may modify as they wish.  Once their pattern is marked on the wood, the spoon is excavated and smoothed with the same tools and techniques used for carving bowls.  Then I cut the bowl outline on the bandsaw and the student carefully shapes the outside of the spoon's bowl to fit the inside shape using a spokeshave.  I then cut out the handle shape and the student refines the contours with a scraper and rough sandpaper. When there are no defects left, the spoon is sanded with finer and finer sandpaper until the surface is glassy smooth. Wood burn a name and a date, possibly a dedication ("For Mom"?) and the spoon is ready for mineral oil.  Some students decorate their spoons with wood burning or carving.
Maddie'sFish SpoonA beautifully made tiny spoon of vermilion with a fish-shaped handle!  It is based on an example we keep in the shop.
Two Spoons
Friends sometimes do parallel projects!  This design came from a book on special spoons.
Megan's spoonA decorative and functional cherry spoon that the student designed herself!
Wood burning

    This is a popular activity in the shop!  Some students like to do a little practice wood burning on pieces of scrap wood when they are between projects.  I often find discarded little chunks of wood with beautiful and imaginative graphics burned on them.  By just playing around, students can discover neat ways to create tones, textures and patterns with the burner pen.  Some do major projects with the "pyrography" stylus, producing work very much worthy of display.  I encourage all students to become acquainted with this fun technique, especially since most projects in the shop are signed and dated by wood burning.

    While many students freehand their wood burnings, we also take graphics from the internet, scale them on the computer and tape them to boards. We then trace the outlines with the burner right through the paper. Then, by adding tone and shadow students can produce impressive work.

    The tools we use are a far cry from the old, inexpensive and frustrating burners that are slow to heat up and clumsy to use.  Those are actually repurposed soldering irons.  Our professional pens heat up in seconds and cool down quickly when turned off, keeping frustration to a minimum and increasing safety.  The pens have sharp edges and points for detailing. We have an efficient venting hood to draw smoke away from student's faces and to keep the shop's air clean.

    A new idea in our shop is to create three dimensional images like the one below left. A paper image is cleverly divided into discrete layers. Taped to thin wood, each layer shape is cutout and wood burned. The parts are then stacked and glued to give the image real depth.
Charlotte 3D burn
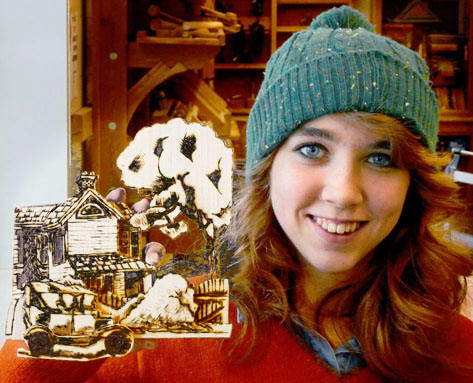
This 3D wood burning was a challenging and very successful innovation for this student who had already developed
formidable burning skills.
Alexa'sWoodburned landscape
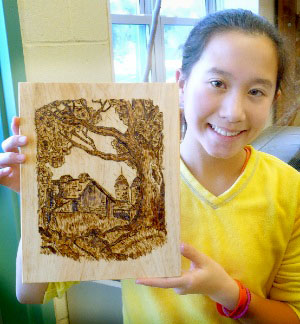
A beautiful burned image from a book on carving country landscapes. She worked hard to develop textures and a broad tonal range
with the wood burner.

Kayla's woodburned mug
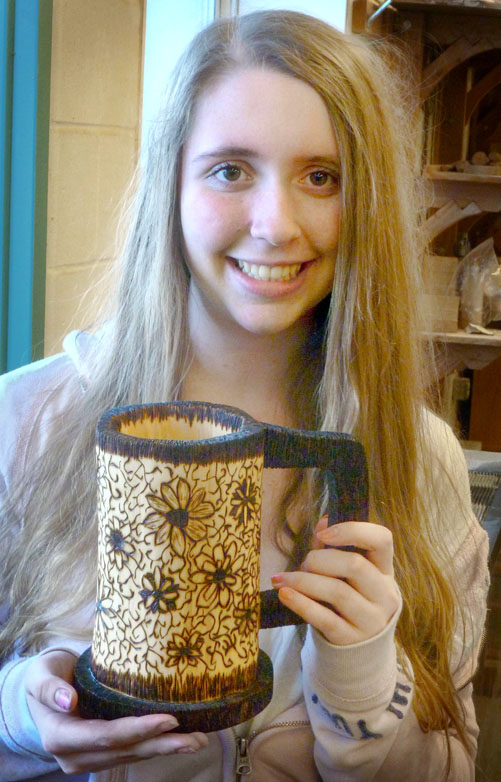
I knew that when this student made a mug, she would cover
 it with burned decoration. Burning was her passion!

    Wood burning is often used to decorate projects like bowls, spoons, boxes and bongo boards. It is also used to "feather" bird carvings. Professional bird carvers create feathered textures on their creations, then paint over the burned texture. We do this too, though an unpainted feathered bird can be quite charming.
Bird burned
This neatly carved chickadee has finely burned feathers!