

| Home | Why Woodworking? |
What are classes like? | Projects 1 |
Projects 2 |
Projects
3 |
Projects 4 |
Who teaches this? |
What Do Students Make 3? (Projects page 3)
Carving
Carving can mean different things to different students. Some ask to make a little creature, like a lion or a chipmunk, but they are not sure how to approach it. Others are in love with whittling with a knife and they look for a project that would be appropriate for that tool: animals, faces and wooden chains are popular. Certain projects, like masks for example, are carved primarily with a gouge and a club or perhaps a crooked knife, a unique Native American tool. Some carving projects can be done with just files and sandpaper. When a student tells me his or her idea, I must find a method based on my estimate of his or her skills, patience and how much accuracy I think the child expects to attain. We do some very simple carvings and some that are amazingly elegant and complex.
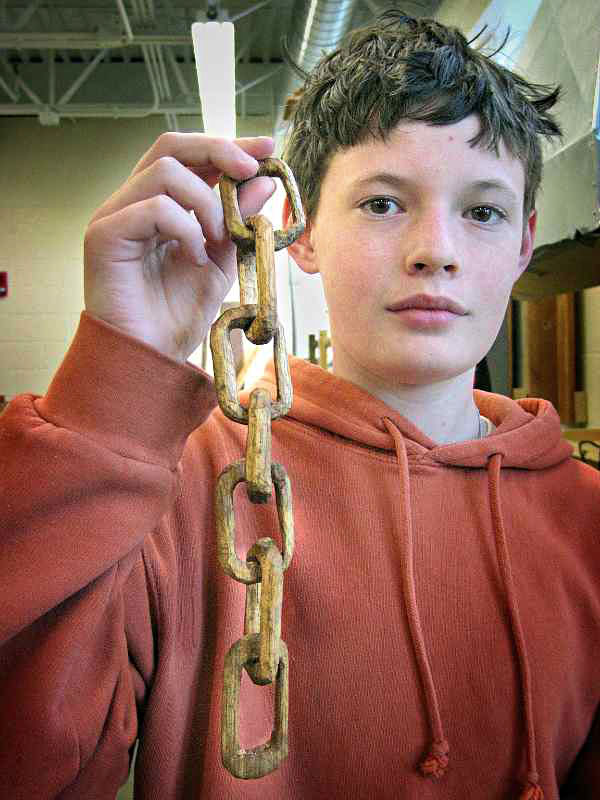 This chain was carved from a single piece of wood, a traditional whittler's challenge. This is his second chain! This chain was carved from a single piece of wood, a traditional whittler's challenge. This is his second chain! |
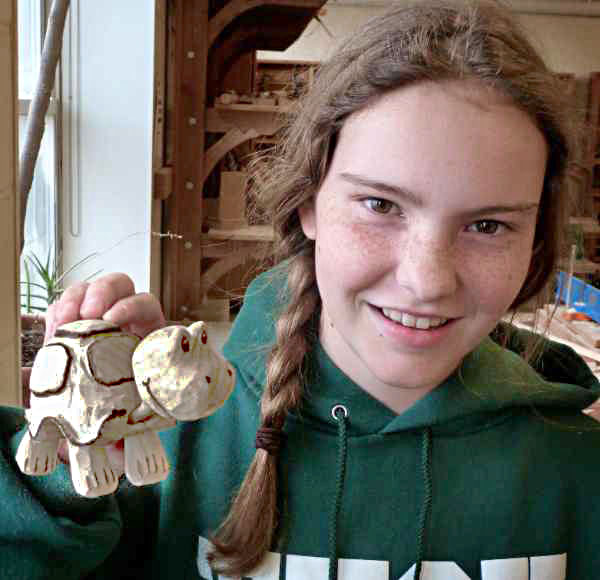 This
imaginative turtle was the student's own design, carved with a knife!
Her tool work so good as to leave a beautiful faceted surface, no
sanding needed! This
imaginative turtle was the student's own design, carved with a knife!
Her tool work so good as to leave a beautiful faceted surface, no
sanding needed! |
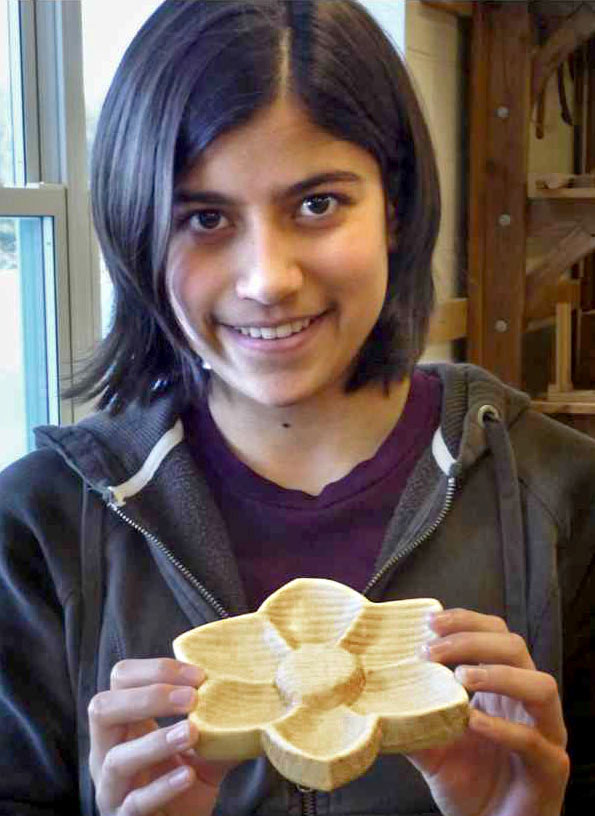  A
flower dish, carved with gouges! A
flower dish, carved with gouges! |
The Knife Lesson
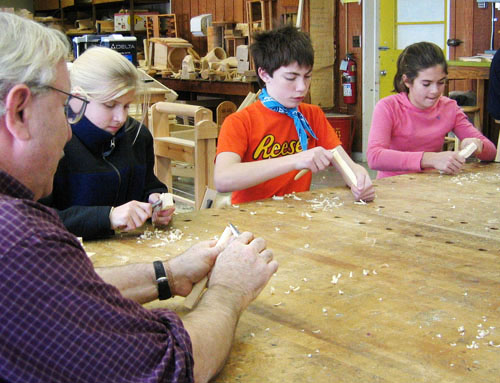 Giving the knife lesson back in the old building! Students are gathered around two workbenches
pushed together! Giving the knife lesson back in the old building! Students are gathered around two workbenches
pushed together! |
It takes a good deal of skill and care to use a whittling knife effectively and safely. That's why I require any student who wants to use one to take the knife lesson. Finding class time to give this intense lesson is difficult, since it takes two full periods of focused work. If there are more than a few students in a class who have already had it, I can't justify breaking out class time for it. Usually, the knife lesson is given at the very beginning of the first quarter, though I always check with each class at the beginning of a new quarter to see if it has the right mix to give it.
Before we begin, I tell students why I love working with a knife: its simplicity and direct contact with the wood. I show them all kinds of projects they can do, and validate the joy of just making shavings while you daydream, once using the knife correctly becomes automatic, as it should.
The method I teach is my own, based on long experience and not a few band aids. In my way, the knife is never allowed to move more that a couple of inches, but it is always in complete control and very powerful. And, if you are paying attention, your fingers are safe. I want this method to become rote, like riding a bicycle. The students learn how to carry a knife and how hand it to someone else (like me, if it needs to be sharpened.) There are two basic cuts, towards yourself and away from yourself. (Someone often offers up the myth that you should never cut towards yourself, untrue unless you don't know what you are doing.) They learn variations on both kinds of cuts, and how never to cut with a knife. They discover how to cut along curves and with the grain, and how to test if the knife is sharp. They learn two basic kinds of stop cuts.
We do this step by step and never move on until everyone gets it. It really does take two full periods, and the kids don't get bored. They think it is cool. When the lesson is done, I carve a small head for them in five minutes or less, to show them how it all works. I use every method I've taught and the students are always fascinated. Some want to try it on their own right away, while others eventually come back to makin
 g
a head.
g
a head.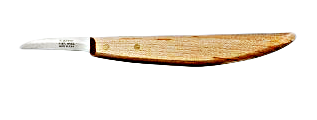
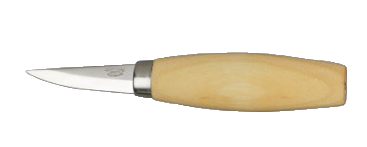
Students who have developed skill and have fallen in love with knife work may be interested in getting a knife to use at home. Parents sometimes ask me where they can buy a good knife as a gift for their child. I'm delighted when that happens! But, as I tell students during the knife lesson, knowing how to use a knife isn't enough. You have to know how to sharpen it too. This isn't part of the knife lesson but I can teach it in a fairly short time if I'm asked. I have found a set of diamond sharpening stones that are inexpensive and work well for beginners. (Here or here.) The kit of knife and sharpening stones can be had for about $40. Please understand that even high quality jack knives or Swiss Army knives will not take an adequate edge for good whittling. My preferred tool is the "Sloyd Knife", above left, with the shortest blade available. (Here or here.) We also use chip carving knives, above right, for whittling as well as chip carving (but that's another story.) These are very short and controllable. (Here.)
E. J. Tangerman's Whittling and Wood Carving is my favorite book on the subject. Published in 1935 or so, it has never been ou of print.
We also use crooked knives, Native American implements that are among my favorite tools. These wonderful carvers are not part of the knife lesson since they are used in a completely different way. I'll add a section on them to this site when I can. Meanwhile, here is a website where you can learn about them and other North West Coast tools and carving. This is a link to their crooked knife page which will tell you a bit about how they are used.
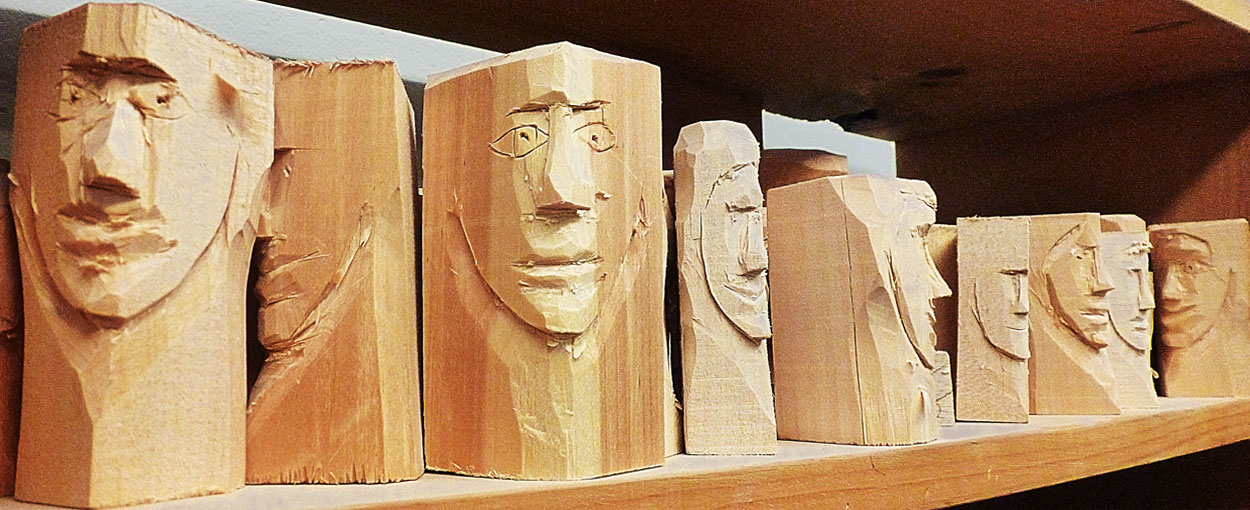 These are the faces I carve very quickly at the end of each knife lesson. I save them all! There are many dozens, staring down at students from a closet shelf, each with a slightly different expression, like a tiny Easter Island! |
Carving Animals
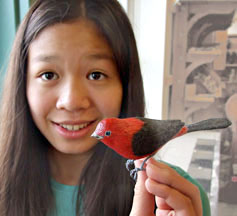
After they've had the knife lesson, at least a few students in each class will ask to carve an animal with the knife. I usually suggest a bird or a fish, since the smooth lines are easy for a beginner to manage. Most go for the chickadee, which, life size, is small enough to be comfortable in the hand and cute enough to be satisfying. Small fish are fun and even easier to carve than birds.
For most birds and fish, we have top and side patterns on the computer that students tape, in alignment, to a block of pine. On the bandsaw, I cut both patterns, which gives students a squared off critter to carve to a lifelike form. They round off the corners to the right shape, and to carve in the details. Files and sandpaper help with the fine shaping. In fact, students who have not had the knife lesson can manage to shape their animal with files alone, though it is slower.
| Home | Why Woodworking? |
What are classes like? | Projects 1 |
Projects 2 |
Projects
3 |
Projects 4 |
Who teaches this? |
 A carefully carved, wood burned and painted bird! She made
the legs of twisted wire covered with CA glue, then painted them. A carefully carved, wood burned and painted bird! She made
the legs of twisted wire covered with CA glue, then painted them. |
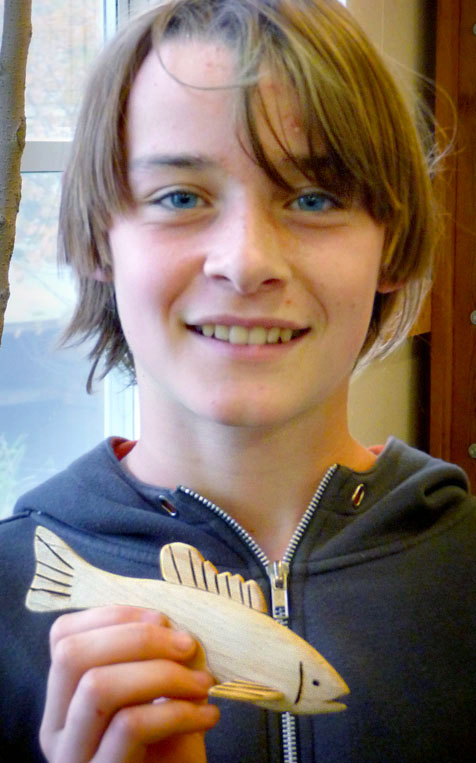 A
nicely carved little fish with added fins. A
nicely carved little fish with added fins. |
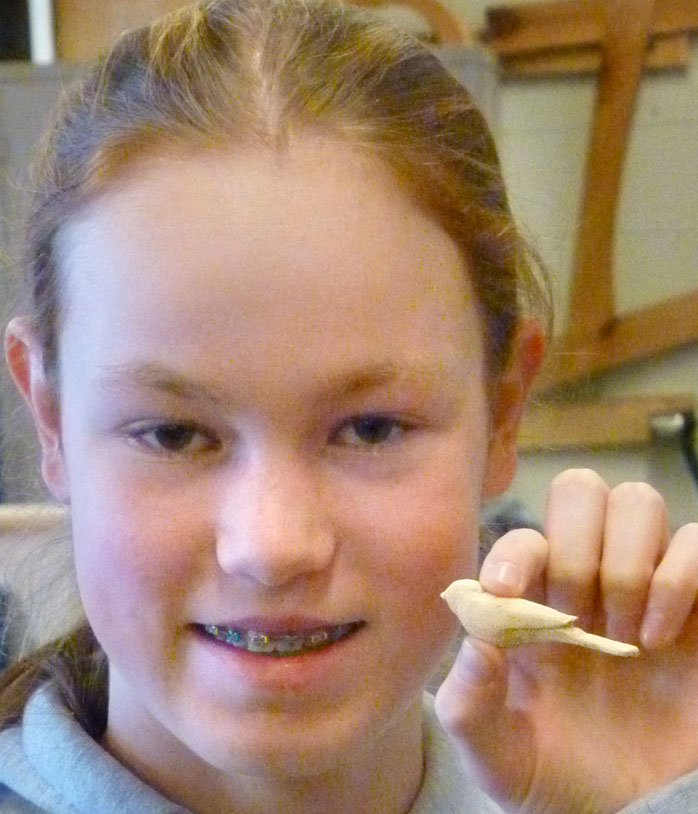 Sometimes
small is big! Carving tiny birds was recently a fad in the shop! Sometimes
small is big! Carving tiny birds was recently a fad in the shop! |
Students may want to
carve
more complex
animals, usually some sort of four legged critter. We have a collection
of patterns on the computer for lions and tigers and bears, not to
mention dogs and
cats. Sometimes I just cut the profile of the animal from a block
of
wood and the student has at it. There can be problems with grain
running the wrong way to weaken elements like legs and tails. Recently
I've worked with students to divide a carving into layers which are
then glued up and carved. That allows us to run the grain for strength
where it is needed. It also gives kids a head start since the
right and left
legs are separated, unlike when carving from a solid block, as in the
bear, below. Lately we have begun using three dimensional images from
Google Sketchup to slice animals into layers for carving, as we did
with the camel, below. This gives the student the opportunity to
view the computer image from any angle to clarify details of shape.
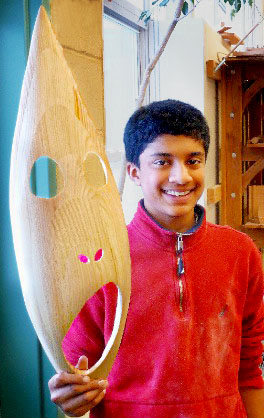
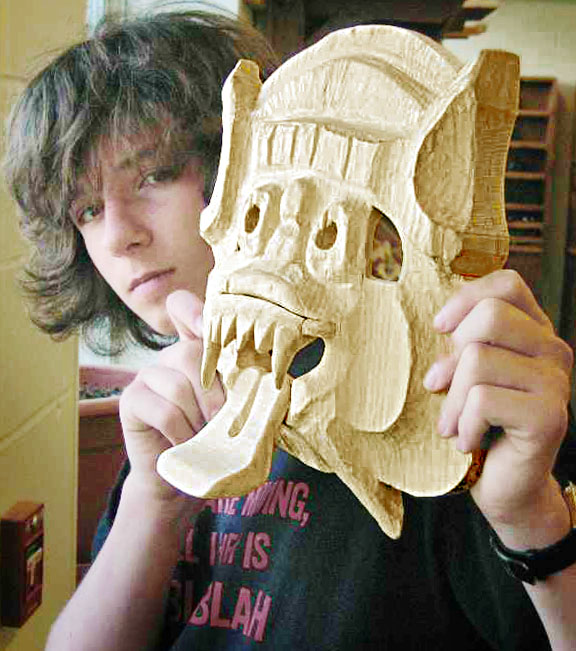
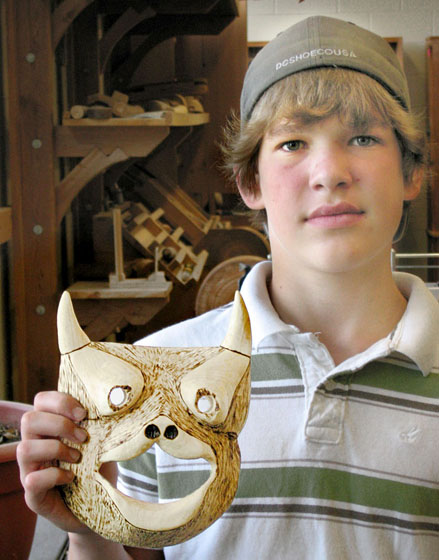
Masks
The wisest thing I know about mask carving came from an Athabaskan carver in Fairbanks, Alaska with whom I studied for a week. She said that a mask comes alive when it is perforated, especially when you cut the eye holes. These openings are the portals between the every day world and spirit world, a door through which a mask allows us to pass. Something special does seem to happen when we cut those eye holes! The students who carve masks seem to understand why they are important in cultures around the world. I keep a number of masks in the shop from Indonesia and Africa, for inspiration.
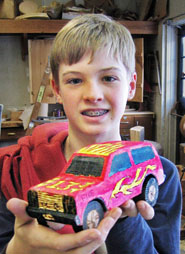
Motor Vehicles
Kids love cars and trucks, even tanks so, of course, we build lots of them. Many designs come from a book in our library which offers part-by-part patterns which are glued together and shaped with files, carving tools and sandpaper. We also search the web for particular models, which we can build if we find a good side view, or even better, a set of isometric plans. Students come to understand why a photo may not be useful if it was taken slightly above or to the side of the subject. We scale images or plans in Photoshop and our monitors are adjusted to give actual size images that match what will print. Finished cars may be wood burned, painted or both. And yes. the wheels turn so the car can scoot across the floor!
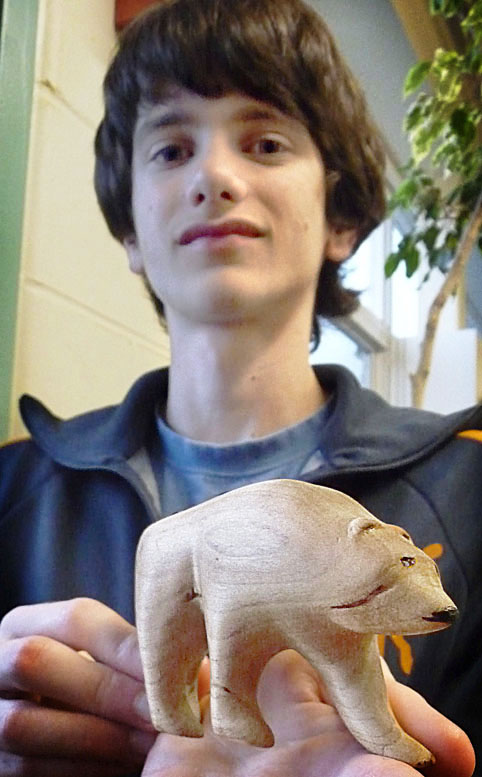 This
fine bear was carved from a block This
fine bear was carved from a blockof butternut band sawed
to the
profile. Because the bear is walking, the original blank appeared to
have four legs that went clear across its body!
|
 Here's
a neatly carved camel made of 3 layers. The outer layers are the
belly and legs, with the grain following the legs. The pattern for this
animal was developed by slicing a 3D image in
Google Sketchup. Here's
a neatly carved camel made of 3 layers. The outer layers are the
belly and legs, with the grain following the legs. The pattern for this
animal was developed by slicing a 3D image in
Google Sketchup. |
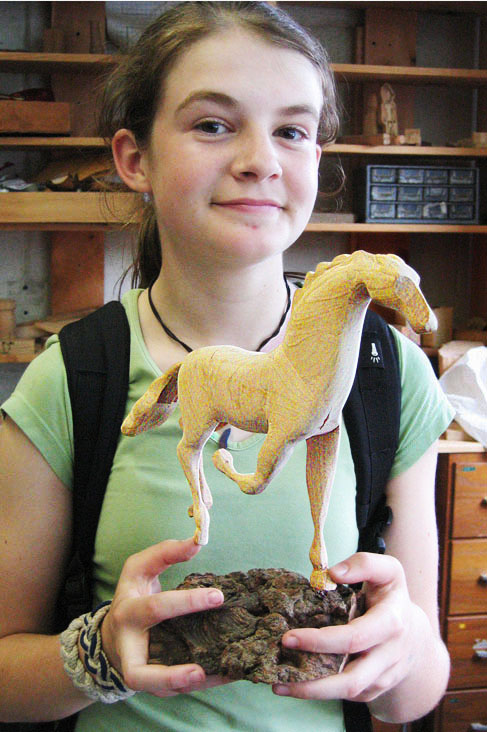 This
elegant horse is assembled from many pieces, each with grain oriented
for strength. The student designed it herself! We have used her
patterns several times since, with permission, of course. This
elegant horse is assembled from many pieces, each with grain oriented
for strength. The student designed it herself! We have used her
patterns several times since, with permission, of course. |
Masks
The wisest thing I know about mask carving came from an Athabaskan carver in Fairbanks, Alaska with whom I studied for a week. She said that a mask comes alive when it is perforated, especially when you cut the eye holes. These openings are the portals between the every day world and spirit world, a door through which a mask allows us to pass. Something special does seem to happen when we cut those eye holes! The students who carve masks seem to understand why they are important in cultures around the world. I keep a number of masks in the shop from Indonesia and Africa, for inspiration.
 Inspired by a famous
painting, it
was carved from a large laminated block of pine and worked very thin
with a crooked knife. A beautiful mask, well shaped and very
light and smooth! Inspired by a famous
painting, it
was carved from a large laminated block of pine and worked very thin
with a crooked knife. A beautiful mask, well shaped and very
light and smooth! |
 Based on an Indonesian mask in the shop,
this successful piece is very well carved, and...frightening! Based on an Indonesian mask in the shop,
this successful piece is very well carved, and...frightening! |
Motor Vehicles
Kids love cars and trucks, even tanks so, of course, we build lots of them. Many designs come from a book in our library which offers part-by-part patterns which are glued together and shaped with files, carving tools and sandpaper. We also search the web for particular models, which we can build if we find a good side view, or even better, a set of isometric plans. Students come to understand why a photo may not be useful if it was taken slightly above or to the side of the subject. We scale images or plans in Photoshop and our monitors are adjusted to give actual size images that match what will print. Finished cars may be wood burned, painted or both. And yes. the wheels turn so the car can scoot across the floor!
 This car
is from the book of plans we use the most. He knew exactly how he
wanted it to look! |
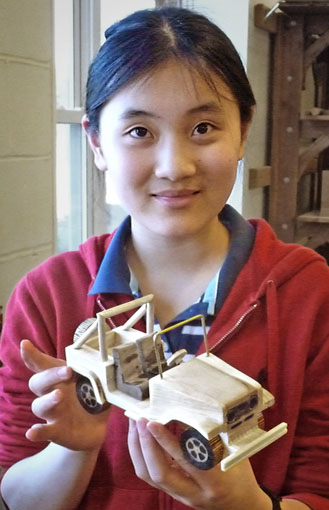 It's a jeep with a roll bar! It's a jeep with a roll bar! |
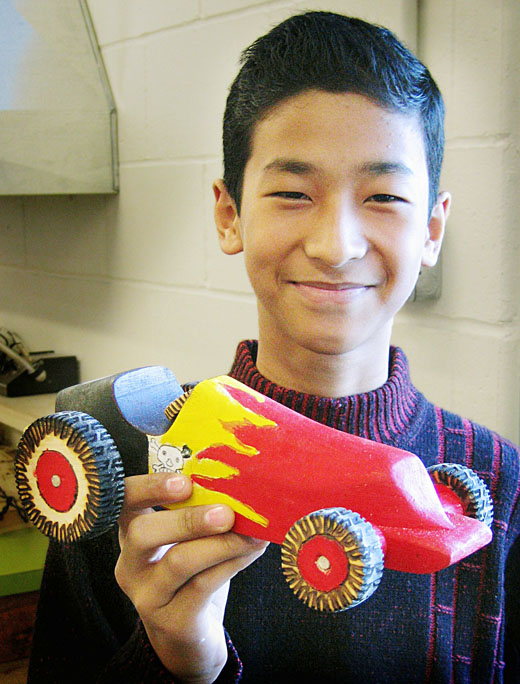 A race car from a book of toys in our library. very
personalized! A race car from a book of toys in our library. very
personalized! |
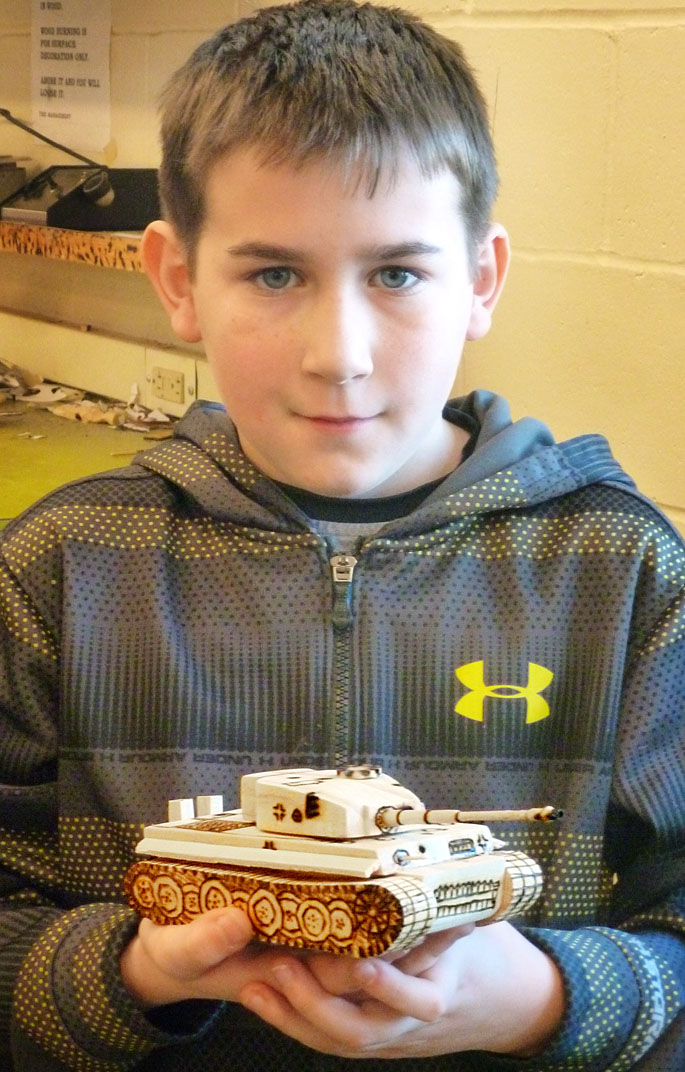 |
It's a scale model of a WWII tank!
|
Aircraft
Planes are even more popular than wheeled vehicles. As a pilot, I'm happy to offer a bit of aviation lore while a student builds his or her aircraft. We get plans from a book in our library or from the internet, as we do with cars. Aircraft, in general, require more extensive and careful shaping than land vehicles.
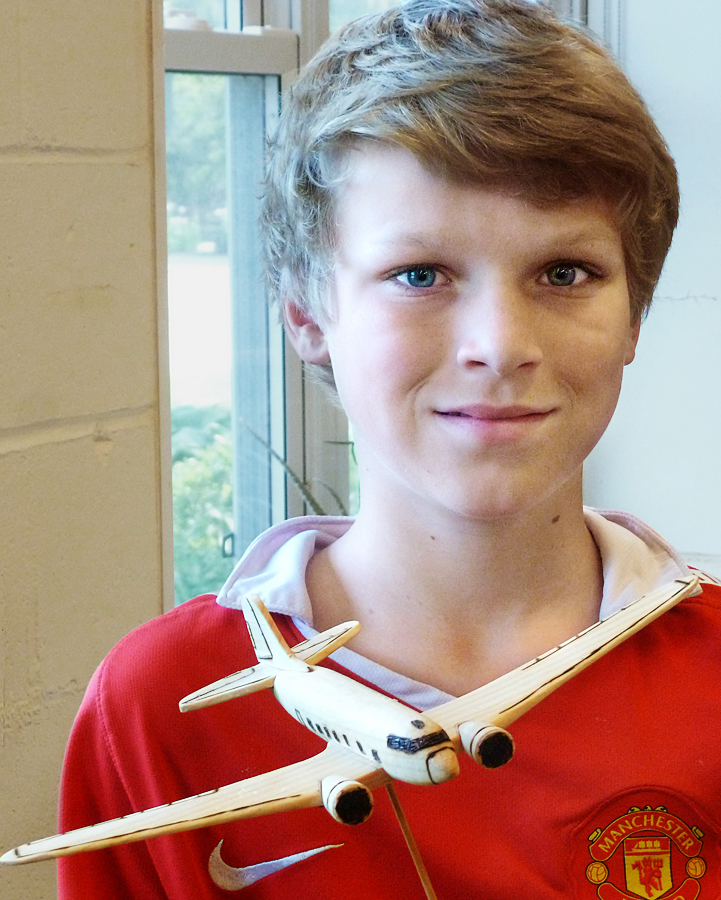 A beautifully detailed DC-3. A beautifully detailed DC-3. |
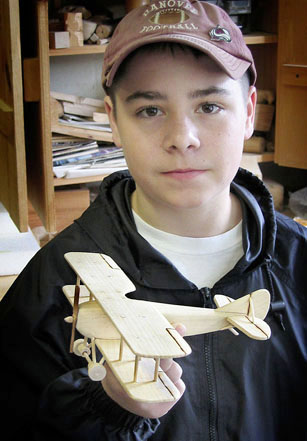 A
neatly crafted biplane with wood burned control surfaces! A
neatly crafted biplane with wood burned control surfaces! |
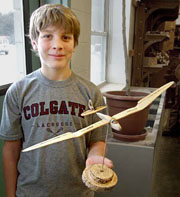 This
is a classic glider, a Minimoa.
It was a gift for his Dad, who flies
gliders in the same club I do. This aircraft was known for its
incredibly complex wing, bent in two directions, which he reproduced
beautifully. This
is a classic glider, a Minimoa.
It was a gift for his Dad, who flies
gliders in the same club I do. This aircraft was known for its
incredibly complex wing, bent in two directions, which he reproduced
beautifully. |
 A very
expressive mask enhanced with wood burned texture. A very
expressive mask enhanced with wood burned texture. |
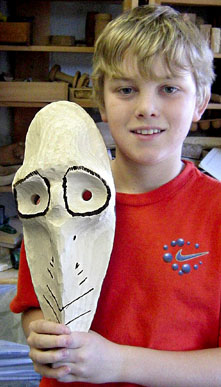 A ghostly mask
with huge eye sockets! A ghostly mask
with huge eye sockets! |
 This is a
mask for a masque!
Beautifully carved and wood burned, it is his second mask! This is a
mask for a masque!
Beautifully carved and wood burned, it is his second mask! |